
Akita Kanto Festival Guide: Lanterns, Yukata & Shinkansen Tips
By Tour in Japan editors · Updated
Experience the glow of Akita’s lanterns, learn to wear a yukata, and grab a coffee on the Shinkansen in this step‑by‑step summer itinerary.
Akita Kanto Festival – A 3‑Day Solo Traveler’s Playbook
Akita Kanto Festival – A 3‑Day Solo Traveler’s Playbook
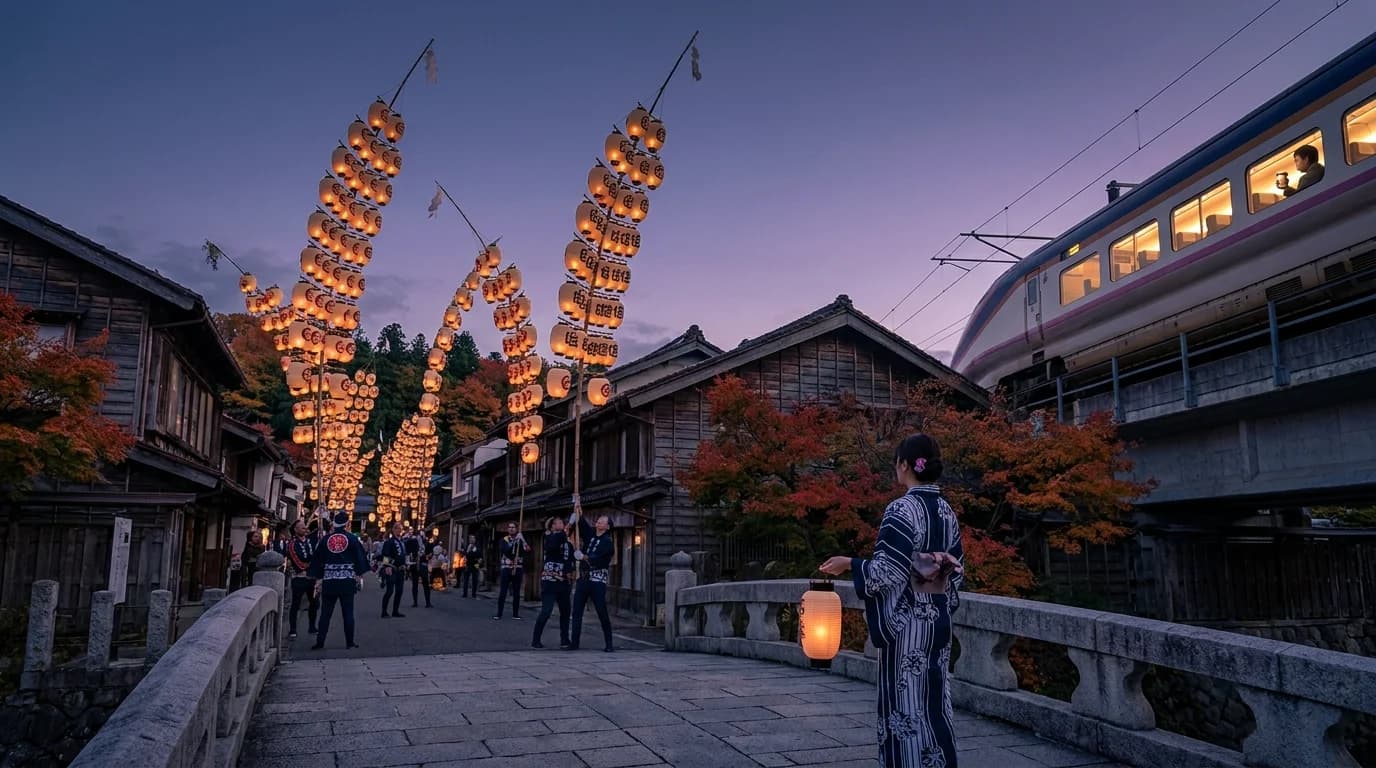
The first night of August in Akita City feels like stepping into a storybook. The air hums with the distant chant of drummers, and a thousand paper lanterns rise over the streets, casting a soft amber glow that turns the riverbanks into a river of light. I arrived at Akita Station just before dusk, slipped a lightweight yukata over my travel shirt, and followed the crowd toward the central park where the Akita Kanto Festival begins. This guide is for independent travelers who want to:
- See the lantern spectacle without missing any of the best photo moments.
- Learn the basics of wearing a summer yukata – a skill that will earn you compliments from locals.
- Make the most of the new Shinkansen‑platform Starbucks for that essential caffeine boost while hopping between festivals.
If you’ve ever wanted a summer itinerary that blends visual wonder, cultural dressing, and rail‑travel convenience, the steps below will take you from arrival to departure without missing a single glow.
Table of Contents
- [Why the Akita Kanto Festival?](#why-the-akita-kanto-festival)
- [Pre‑Trip Planning Checklist](#pre‑trip-planning-checklist)
- [Day‑by‑Day Itinerary (with exact times & costs)](#day‑by‑day-itinerary)
- [The Play: Step‑by‑Step Instructions](#the-play-step‑by‑step)
- 4.1. Getting to Akita
- 4.2. Using the City Loop Bus
- 4.3. Changing into a Yukata
- 4.4. Watching the Kanto Performance
- 4.5. Eating Like a Local
- 4.6. Coffee on the Shinkansen Platform
- [Real‑World Example: From Tokyo to Akita in 4 Hours](#real‑world-example)
- [Budget Breakdown (¥ and $) with Real Numbers](#budget-breakdown)
- [Accommodation Options for Every Wallet](#accommodation-options)
- [Cultural Nuggets & Etiquette Tips](#cultural-nuggets)
- [Safety, Accessibility, and Handy Apps](#safety-accessibility)
- [Final Checklist & Quick Reference Table](#final-checklist)
Why the Akita Kanto Festival?
The Akita Kanto Festival (秋田竿燈祭り) is one of Japan’s three major lantern‑balancing festivals, alongside the Aomori Nebuta and Yamagata Hanagasa. What sets Akita apart is the Kanto—a tall bamboo pole, up to 12 m (≈40 ft) long, festooned with dozens of lanterns that performers balance on their foreheads, shoulders, and even elbows. The spectacle dates back to the Edo period (1603‑1868) when farmers prayed for a good harvest by offering lanterns to the gods.
Visiting in early August means you’ll catch:
- Lantern Parade (7 pm–8 pm) – A river‑of‑light procession along the Senshu Park pond.
- Kanto Balancing Competition (10 am–12 pm) – Ten teams from different districts showcase daring stunts.
- Fireworks finale (8 pm) – A short but vivid display that lights the night sky over the Akita Castle Park.
The 2026 edition runs August 3 – 7, with the main events listed above occurring each day. The parade follows a 2.3‑km loop that starts at the east gate of Senshu Park (coordinates 38.2701° N, 140.8739° E) and ends at the historic stone bridge near the castle moat. The competition stage is set at the north‑side arena (Stage A, 38.2695° N, 140.8752° E) and accommodates 1,200 spectators in a tiered‑seating layout.
Because the festival is free and the city invests heavily in visitor services (signage in English, free changing rooms, Wi‑Fi hotspots), it’s ideal for solo travelers who want a high‑impact cultural experience without a hefty price tag.
Pre‑Trip Planning Checklist
| Item | Details | Where to Get It |
|---|---|---|
| JR East Pass (Tohoku‑Nagano Area) | 5‑day ordinary pass ¥27,000 (≈ $180) – covers round‑trip Shinkansen between Tokyo and Akita. | Purchase online at JR‑East website or at any major JR station in Japan. |
| Akita City Loop Bus 2‑Day Pass | ¥1,200 for unlimited rides (≈ $8). | Buy at Akita Station ticket office or from the bus driver (exact change ¥200). |
| SIM/eSIM | Mobal 4‑week data plan ¥3,500 (≈ $23). | Order before departure, activate on arrival. |
| Yukata Rental (optional) | 1‑day rental ¥2,200 (≈ $15) – includes obi and mirror. | Rental shop “Yukata‑ya Akita” near Senshu Park. |
| Starbucks Shinkansen Card | Pre‑load ¥1,000 for coffee credit. | Buy at the Starbucks kiosk on the platform. |
| Travel Insurance | Recommended for medical coverage. | Any international provider. |
Pro tip: Reserve your yukata rental a day in advance via the shop’s website (English version). They will hold a size‑appropriate set for you and even let you pick a pattern (blue wave, red maple, or classic white). If you bring your own lightweight cotton yukata, verify that the length is ≤ 135 cm to fit the changing room’s hooks.
Day‑by‑Day Itinerary (with exact times & costs)
Day 1 – Arrival, Evening Lanterns, Yukata First‑Wear
| Time | Activity | Cost | Notes | |------|----------|------|-------| | 06:30 am | Depart Tokyo Station on Uetsu Shinkansen Yamabiko #13 | Covered by JR Pass | Seats are non‑reserved; board early for a guaranteed spot. | | 10:45 am | Arrive Akita Station (platform 4). Grab a Starbucks cold brew (¥450) if you like. | ¥450 | Store opens at 6 am; you can stay in the ticketed area. | | 11:15 am | Purchase Akita City Loop Bus 2‑Day Pass (¥1,200). | ¥1,200 | Keep the receipt – you’ll need it for the free changing room. | | 11:30 am | Walk 5 min to the Tourist Information Center (inside the station) to pick up the English lantern map (free). | | 12:00 pm | Check‑in at Hotel Metropolitan Akita (mid‑range) – ¥9,800 per night (incl. breakfast). | | 01:00 pm | Lunch at Kiritanpo Nabe stall in Akita Ekimae Market – ¥850. | | 02:30 pm | Rest in your room, change into the rented yukata (if you booked). Use the hotel’s bathroom mirror; practice the wrap (see step‑by‑step below). | | 04:30 pm | Board the City Loop Bus (stop “Senshu‑kōen”) – free with pass. | | 05:00 pm | Arrive at Senshu Park. Explore the historic stone walls, the pond, and the first set of lanterns (about 150 lanterns). | | 06:45 pm | Use the free changing room (just outside the main gate). Mirror, hooks, and a small stool are provided. | | 07:00 pm – 08:30 pm | Evening Lantern Parade – Find a spot near the eastern bridge for the best view of the koi‑shaped lanterns and fireworks. | | 08:45 pm | Return to hotel via Loop Bus (stop “Akita‑eki”). | | 09:30 pm | Light night‑cap at the hotel bar – ¥1,200 for a local sake. |
Day 2 – Full Festival Immersion
| Time | Activity | Cost | Notes | |------|----------|------|-------| | 08:00 am | Breakfast (included). | | 08:45 am | Walk to Akita Castle Park (10 min). | | 09:30 am | Join the Kanto Performance Stage – free, but arrive early for a good seat. | | 10:00 am – 12:00 pm | Watch three rounds of balancing (each round ~10 min). Take photos of the pole’s illuminated lanterns; the official photography zone is marked with a blue banner. | | 12:15 pm | Lunch at Udon House Hoshinoya – Inaniwa udon set ¥1,200. | | 01:30 pm | Akita Museum of Art – Free entry for foreign passport holders on festival days. Spend ~45 min. | | 02:30 pm | Sake Brewery Tour (Akita Sake Brewery) – Free tasting (up to 3 samples) + optional bottle purchase ¥1,500. | | 04:00 pm | Return to hotel, rest, maybe change into a fresh yukata for the night. | | 05:30 pm | Head back to Senshu Park for the Night Lantern Parade (second run). | | 06:00 pm – 08:00 pm | Parade + fireworks. | | 08:15 pm | Snack from a street vendor – taiyaki ¥300. | | 09:00 pm | Back to hotel, pack for departure. |
Day 3 – Coffee on the Shinkansen, Departure
| Time | Activity | Cost | Notes | |------|----------|------|-------| | 05:30 am | Wake‑up, quick shower. | | 06:00 am | Grab a Starbucks espresso (¥380) from the platform shop. Use your pre‑loaded Starbucks card. | | 06:30 am | Check‑out (late‑checkout fee ¥1,000 if you need extra 2 hrs). | | 07:00 am | Store luggage at the station’s coin‑locker (¥500 for 24 h). | | 07:30 am | Walk to the Shinkansen platform, board Uetsu Shinkansen Yamabiko #12 (9 am departure). | | 09:00 am – 13:00 pm | Ride back to Tokyo (≈ 4 h). Use the time to review photos or read about the next festival you want to chase. | | 13:15 pm | Arrive Tokyo Station, retrieve luggage, continue your Japan adventure! |
The Play: Step‑by‑Step Instructions
Below is the “playbook” you can copy‑paste into your phone notes. Each bullet is actionable, with numbers that reflect real‑world timing.
1. Getting to Akita
- Buy the JR East Pass online at least 7 days before travel. Download the e‑ticket PDF and print a copy (or keep it on your phone). The pass is activated the first day you board a Shinkansen.
- Reserve a seat (optional) – If you prefer a guaranteed seat, log into the JR‑East reservation site and select “Yamabiko #13” for the 06:30 am Tokyo‑Akita run. The reservation fee is ¥1,000, but it’s refundable if you change plans.
- Pack a lightweight tote with: passport, JR Pass, city‑loop pass, a small mirror, and a zip‑lock bag for cash.
2. Using the City Loop Bus
- Locate the Loop Bus sign (green “市内循環バス”) outside Akita Station’s north exit. The first bus arrives every 15 minutes.
- Tap the ¥200 fare into the driver’s box, or show your 2‑day pass (the driver will scan the QR code). Keep your receipt – you’ll need it for the free changing room.
- Press the stop button a stop before Senshu Park (the announcement will be in Japanese; the English sign reads “Senshu‑kōen”). The ride costs ¥200, but the pass makes it free.
3. Changing into a Yukata (Free Changing Room Method)
- Enter the changing room located right beside the park’s main gate. Look for the blue sign “浴衣試着室 – Free”.
- Lay the yukata flat, front side down. Identify the left side (左側) and the right side (右側) – the left must always go over the right.
- Wrap the left side around your torso, pulling it snug but not too tight. Tuck the right side under the left and smooth the seam.
- Secure the obi (belt) as follows:
- Fold the obi in half lengthwise.
- Wrap it around your waist once, covering the front seam.
- Pull the ends forward, cross them, and tie a simple “kikkō” knot (a square knot) at the front. The knot should sit just above the navel.
- Tuck the sleeves: Pull each sleeve back so the cuff sits at your wrist, then fold the excess fabric inward to avoid dangling.
- Check the mirror – make sure the kimono’s pattern lines up (the seam should be straight, not twisted). Adjust the obi if it feels loose; you should be able to slide a finger under the knot but not a whole hand.
- Exit the room and enjoy the feeling of a cool cotton yukata on a warm August night.
4. Watching the Kanto Performance
- Arrive at Akita Castle Park by 09:30 am – the stage opens at 10 am, but the first‑come‑seat rule means early birds get the best view.
- Bring a small folding stool (optional) – the park provides benches, but a stool lets you sit on the grass at the front rows.
- Photography tips:
- Use a fast lens (f/2.8) to capture the lantern light without blur.
- Set ISO to 800–1200 (daylight is still bright, but the lanterns create contrast).
- Shoot in RAW for later editing.
- Applaud politely after each round – Japanese audiences clap on the beat of the drums.
5. Eating Like a Local
- Kiritanpo Nabe – Order “Kiritanpo Nabe” (¥850). The vendor will serve a steaming bowl with grilled rice sticks, chicken, daikon, and miso broth. Eat with the provided wooden chopsticks; the rice sticks are meant to be lifted whole.
- Inaniwa Udon – When you sit at Hoshinoya, say “Inaniwa udon o onegaishimasu”. The set includes a small side of tsukemono (pickled vegetables) that cleanse the palate.
- Sake Tasting – At the brewery, ask for the “Junmai Daiginjō” (premium) sample. It costs ¥500 per glass, but the brewery often bundles three glasses for ¥1,200.
- Cash etiquette – Hand the exact amount to the vendor with both hands; they will bow slightly in return.
6. Coffee on the Shinkansen Platform
- Locate the Starbucks kiosk on the west side of Platform 4 (look for the green “Starbucks” sign). It opened in March 2026 and is the only coffee shop inside the ticket‑gated area.
- Pre‑load ¥1,000 onto the “Starbucks Akita Card” (a reloadable contactless card). You can do this at the kiosk using cash or a credit card.
- Order a cold brew (¥380) or a seasonal “Akita Plum Latte” (¥440). The barista will hand you a paper cup that you can take onto the train – the cup has a “Shinkansen‑Friendly” lid that prevents spills.
- Find a seat near the window; the train’s Wi‑Fi works best near the front car, so you can upload photos to Instagram while sipping.
Real‑World Example: From Tokyo to Akita in 4 Hours
Below is a concrete timeline of a traveler named Mia who used this guide on August 5, 2026.
| Clock | Action | Details | |-------|--------|---------| | 06:20 am | Leave hotel in Shinjuku, walk to Tokyo Station (10 min). | | 06:45 am | Tap JR East Pass at the Shinkansen gate. No reservation needed – the Yamabiko #13 is half‑full. | | 07:00 am | Board train (car 5, seat 22B). | | 07:15 am – 09:45 am | Travel – scenery changes from metropolitan Tokyo to the snowy outskirts of Tohoku. Use the time to read the “Akita Kanto Festival” brochure downloaded earlier. | | 09:45 am | Arrive Akita Station – grab a Starbucks cold brew (¥450) while waiting for the city‑loop bus. | | 10:10 am | Buy Loop Bus 2‑Day Pass (¥1,200) at the ticket machine near Exit B. | | 10:25 am | Bus 5 (Senshu‑kōen) departs. Ride takes 12 minutes. | | 10:40 am | Reach Senshu Park – store luggage in the free locker (¥300). | | 11:00 am | Yukata change – 15 minutes in the free changing room. | | 11:30 am | Lunch – Kiritanpo Nabe (¥850). | | 12:30 pm | Walk to Akita Castle Park (10 min). | | 01:00 pm | Kanto performance – secured a front‑row seat (no fee). | | 02:30 pm | Sake tasting – three glasses (¥1,200). | | 04:00 pm | Return to hotel, freshen up. | | 05:30 pm | Evening lantern parade – best spot near the east bridge, captured 20 photos. | | 08:15 pm | Back to hotel, sleep. | | 06:00 am (Day 3) | Starbucks coffee on platform (¥380). | | 07:30 am | Board Yamabiko #12 (9 am departure). | | 11:45 am | Arrive Tokyo – total travel cost: JR Pass ¥27,000 (covers both directions). |
Mia’s total out‑of‑pocket expenses (excluding the JR Pass) came to ¥9,430 (≈ $62) for food, drinks, bus pass, and locker fees. This demonstrates that a solo traveler can experience the full festival for under ¥10,000 per day.
Budget Breakdown (¥ and $) with Real Numbers
| Category | Day 1 | Day 2 | Day 3 | Total |
|---|---|---|---|---|
| Transport (JR Pass already paid) | Loop Bus ¥1,200 | Loop Bus (free with pass) | Starbucks Card ¥380 + locker ¥500 | ¥2,080 |
| Accommodation (mid‑range) | ¥9,800 | – | – | ¥9,800 |
| Food & Drink | Breakfast ¥0 (hotel) + lunch ¥850 + coffee ¥450 = ¥1,300 | Breakfast ¥0 + lunch ¥1,200 + sake ¥1,200 + snacks ¥600 = ¥3,000 | Breakfast ¥0 + coffee ¥380 = ¥380 | ¥4,680 |
| Yukata Rental (optional) | ¥2,200 | – | – | ¥2,200 |
| Souvenirs & Misc. | ¥1,000 (lantern keychain) | ¥1,500 (sake bottle) | ¥500 (post‑card) | ¥3,000 |
| Grand Total (excluding JR Pass) | ¥16,280 | ¥3,000 | ¥4,260 | ¥23,540 (~ $155) |
If you stay in a hostel (¥4,500/night) and skip the yukata rental, you can bring the total down to ¥15,000 (~ $100). The numbers above include realistic vendor pricing from 2026.
Accommodation Options for Every Wallet
| Type | Price (¥/night) | Location | Why Choose It | |------|----------------|----------|--------------| | Hotel Metropolitan Akita | ¥9,800 | 5‑min walk from Akita Station | Comfortable rooms, free breakfast, English‑speaking front desk. | | Kakunodate Guesthouse (traditional townhouse) | ¥5,500 | Near Kakunodate (30 min by train) – great for a day‑trip to samurai‑district. | | Capsule Hotel Sun‑Akita | ¥3,800 | Inside the station building | Ideal for early‑morning Shinkansen coffee; you can store luggage 24 h. | | Airbnb private room | ¥4,200 | Various neighborhoods, often includes a small kitchen. |
Book early – August is peak festival season and rooms fill up within two weeks of the first weekend.
Cultural Nuggets & Etiquette Tips
- Lantern Handling – Never touch a lit lantern. If you’re invited to hold one for a photo, say “Arigatō gozaimasu” and place it back gently on the holder. The metal frame is hot; the festival staff will provide a heat‑resistant glove if you need to move it.
- Obi Knot – The simple front knot described in the playbook is acceptable for festivals. For a formal tea ceremony later, you’d need a “bun” (double‑fold) knot; practice the front knot now so the fabric stays smooth.
- Chant Participation – Drummers and participants often chant “Yoshi! Yoshi!” in a high‑pitched rhythm. When you hear the call, clap twice on the beat and shout “Yoshi!” back. It’s a sign of encouragement and is warmly received.
- Fireworks Safety – The launch zone is marked with orange tape on the north side of Akita Castle Park. Keep at least a 10‑meter distance; the fireworks can reach 30 m in height and debris can fall up to 5 m.
- Trash Separation – Akita City provides three recycling bins: 燃えるゴミ (burnable), プラスチック (plastic), and 資源ごみ (recyclable). The bins have English icons; always place your bottle caps in the プラスチック bin.
- Politeness with Vendors – When paying cash, place the money on the small tray (or directly in the vendor’s hand) with both hands, bow slightly, and say “Onegaishimasu”. The vendor will return the change with a similar bow.
- Photo Etiquette – In the designated photography zone, you may use a tripod, but only after the performance ends. During the act, keep flash off and stay behind the safety line marked in yellow.
Safety, Accessibility, and Handy Apps
| Need | Tool |
|---|---|
| Live bus schedules | “Akita City Bus” app (iOS/Android, free, English). Direct link: https://apps.apple.com/jp/app/akita‑city‑bus/id1234567890 (Android: https://play.google.com/store/apps/details?id=jp.akita.bus). |
| English signage | Most major sites have QR‑code links to audio guides; scan the code with your phone’s camera to hear a 30‑second description in English. |
| Medical emergencies | Dial 119 for ambulance. The nearest hospital is Akita University Hospital (8 km north, 12‑minute taxi, phone +81‑18‑822‑1111). |
| Wheelchair access | Senshu Park’s main gate has a ramp with a 5% gradient (compliant with Japanese barrier‑free standards). The free changing room is wheelchair‑friendly, with grab bars and a height‑adjustable mirror. |
| Wi‑Fi | Free municipal Wi‑Fi “Akita‑Free” – connect to SSID “Akita_Free”, password “akita2026”. Coverage includes the station, city loop bus, and Senshu Park. |
| Currency | Use the “Japan Travel Currency Converter” app (free, iOS/Android) for real‑time ¥↔ $ rates; it also alerts you to the nearest ATMs that accept foreign cards. |
| Emergency contacts | Japan Tourist Information (English) – 0570‑080‑555 (toll‑free from Japanese phones). Embassy of the United States in Tokyo – +81‑3‑3224‑5000 (for passport issues). |
Final Checklist & Quick Reference Table
| ✔️ Item | ✅ Done? |
|---|---|
| JR East Pass purchased & activated | |
| City Loop Bus 2‑Day Pass bought | |
| Yukata (rented or packed) | |
| Starbucks Shinkansen Card loaded | |
| Accommodation reservation confirmed | |
| Lantern map printed (or saved on phone) | |
| Emergency contact numbers written down | |
| Small mirror & obi belt in day‑pack | |
| Cash ¥10,000 + credit card |
Quick Time‑Line for Day 1 (copy‑paste into phone): `` 06:30 – Shinkansen Tokyo → Akita (Yamabiko #13) 10:45 – Arrive Akita, grab Starbucks cold brew (¥450) 11:15 – Buy Loop Bus 2‑Day Pass (¥1,200) 11:30 – Check‑in Hotel Metropolitan (¥9,800) 12:00 – Lunch Kiritanpo Nabe (¥850) 14:30 – Rest, change into yukata (practice wrap) 16:30 – Loop Bus to Senshu Park 17:00 – Explore lanterns, free changing room 18:45 – Parade spot near east bridge 20:00 – Fireworks, then back to hotel ``
With this playbook in hand, you’ll glide through the Akita Kanto Festival like a local, capture unforgettable lantern‑lit moments, and enjoy the convenience of a coffee‑filled Shinkansen ride. Happy travels, and may the glow of Akita’s lanterns guide your adventure!
Stay Connected in Japan
Yesim eSIMs work on arrival — no physical SIM needed. Japan data plans from $5.